A long time ago, in a galaxy far, far away- I started planning a make-over for the fireplace wall in my living room. This project wasn't something that I thought we would ever undertake when we bought this house. Upon first moving in the wall seemed just fine, and nothing that I hated or couldn't live with.

But as time marched on and we started changing things in the living room and kitchen, the fireplace wall felt too heavy and rustic for what was going on in the rest of the house. We added a reclaimed wood wall using E & S tiles to the living room, and adding this texture and focal interest to the wall seemed to compete with the heavy rock on the fireplace.

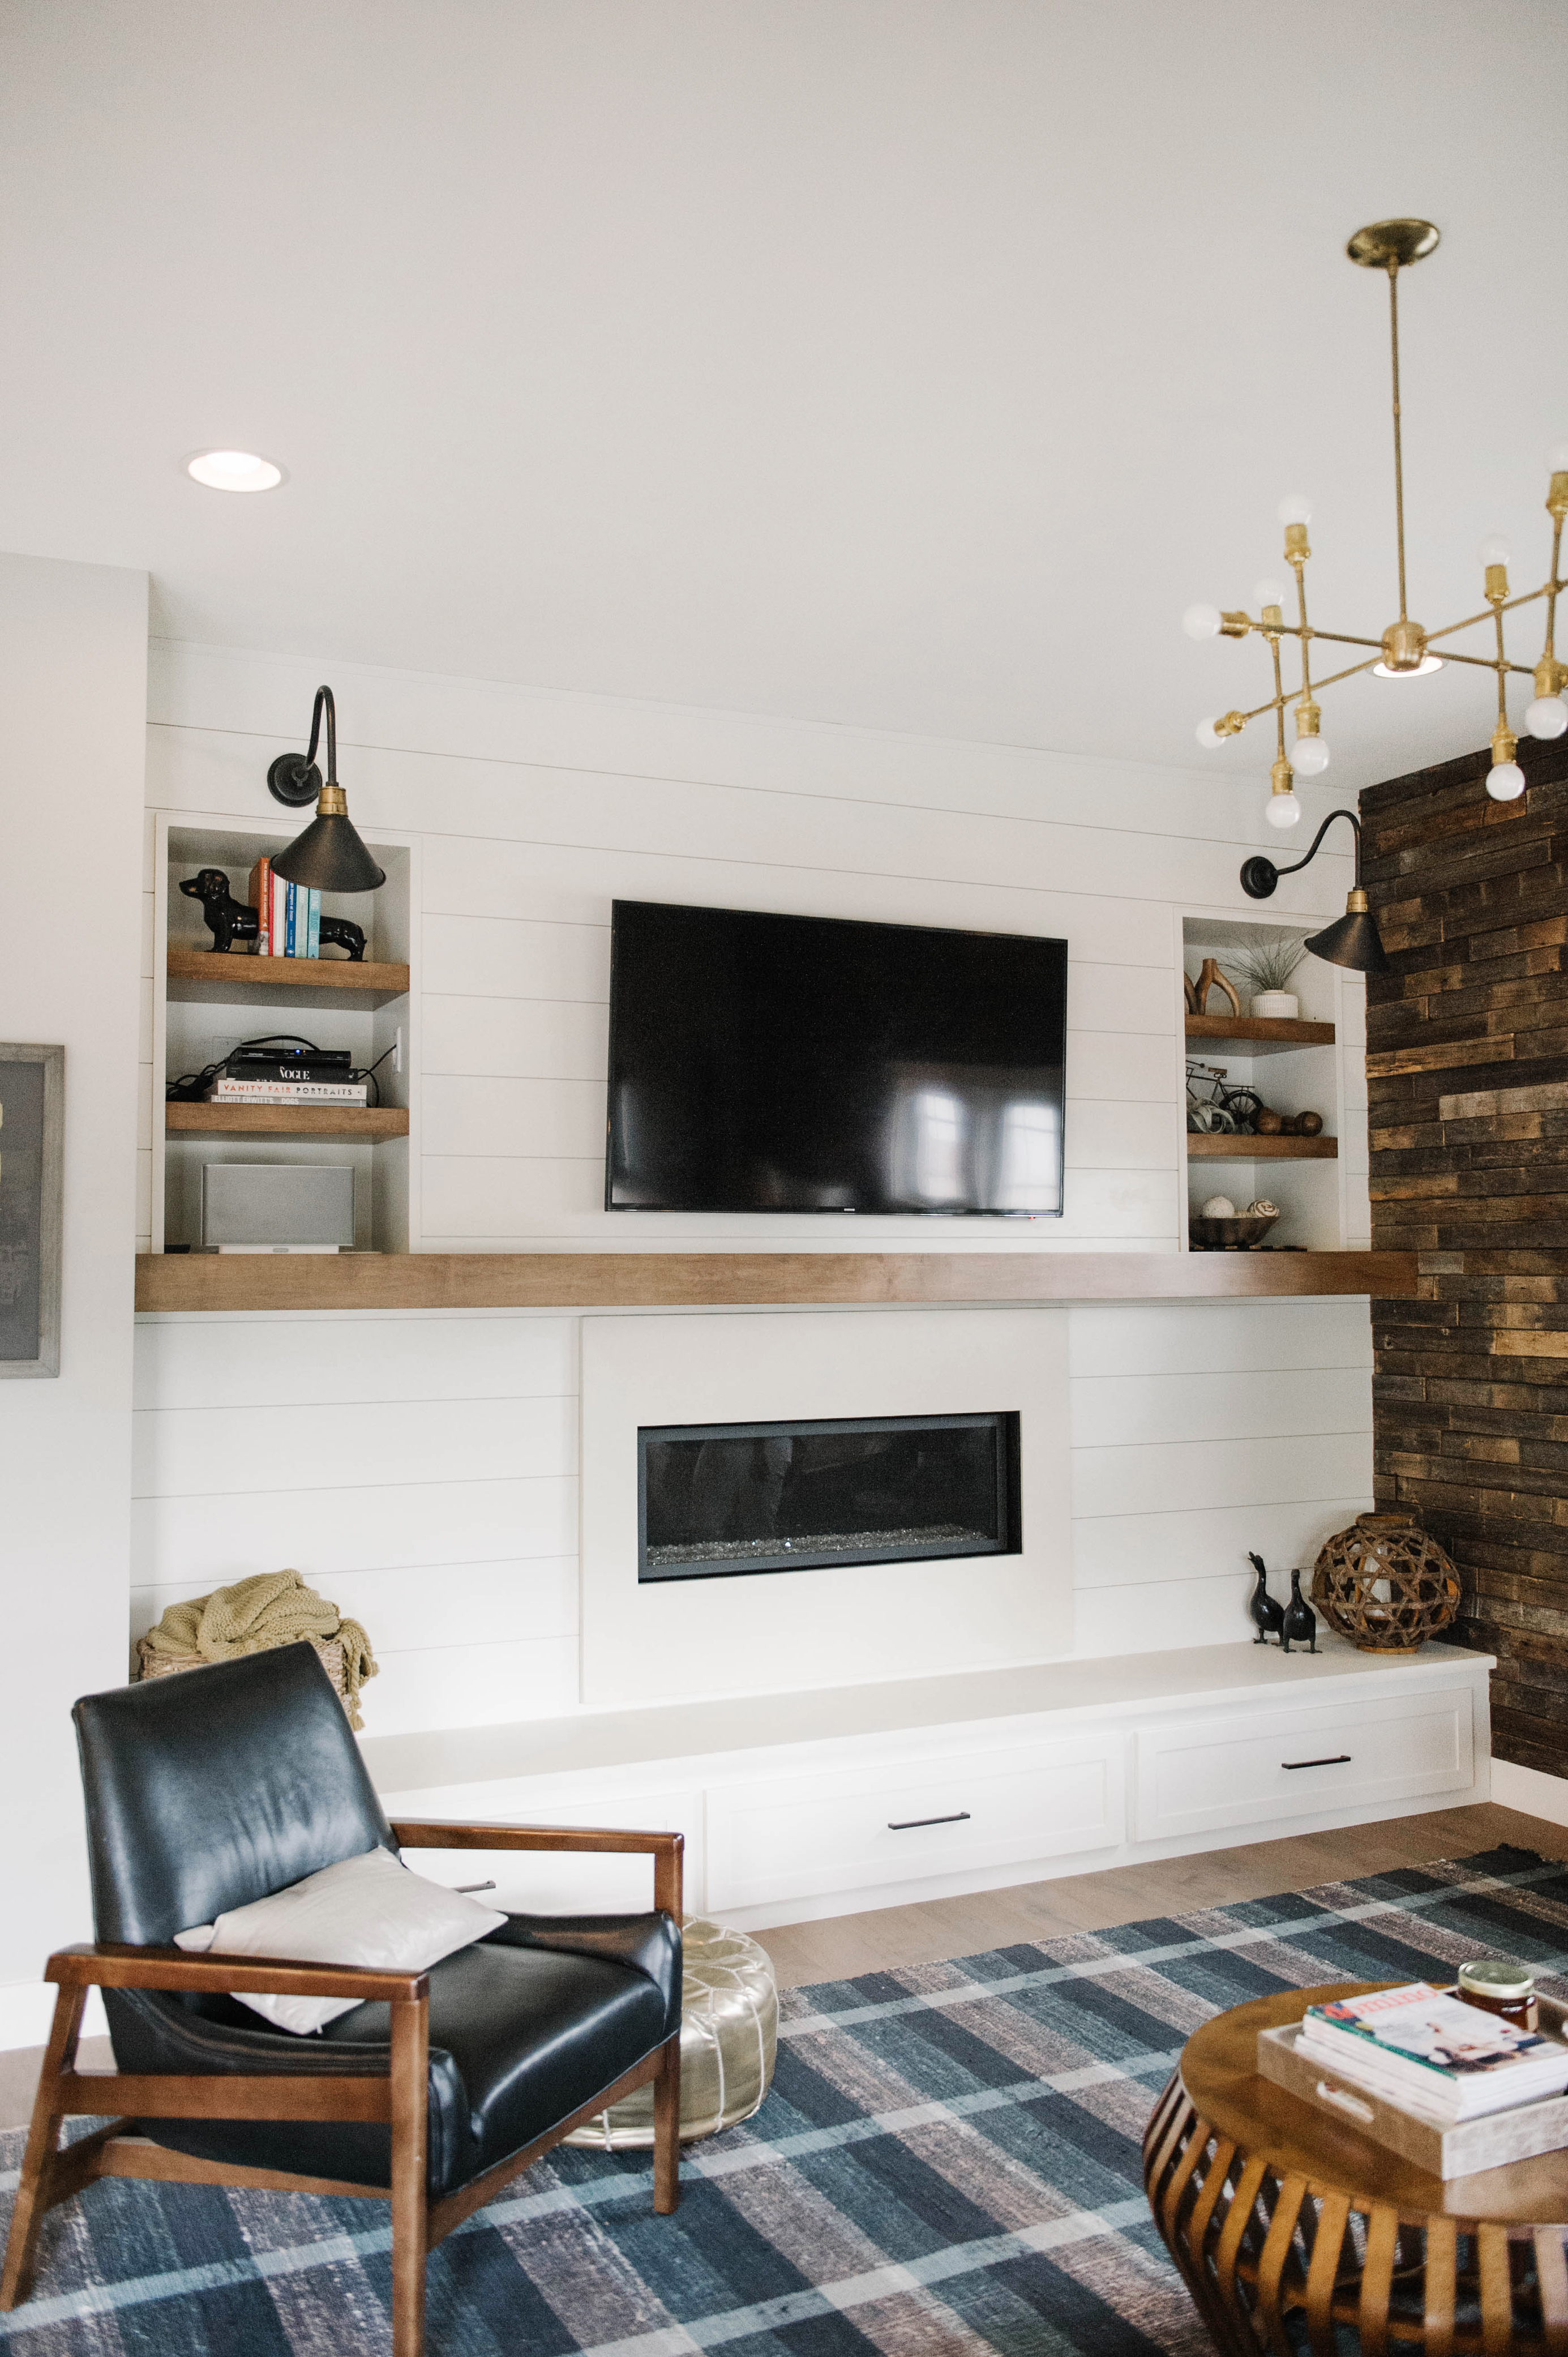
I realize that the reclaimed wood trend is just that, a trend that will be out of style at some point. But for now I still love that wood wall and I wasn't about to take it down to make the fireplace wall work. Because in the end I just wasn't crazy about the asymmetry of the fireplace wall. The built-in's flanking the fireplace are not the same width (drives me bonkers!) and very deep, making it hard to style all that space. And the drawers underneath the hearth are awesome for storing toys and dvd's, but having 9 handles really made the space look busy. Finally, the fireplace itself. The fireplace unit didn't have a fan so whenever we turned it on the only place that got heated up was directly in front of the fireplace. And the rest of the house was freezing because the thermostat is close by and would turn off the heat. Truth- the fireplace not having a fan wasn't THAT big of a deal, I really wanted a more modern looking fireplace though so lack of fan was the reasoning I used with my husband for getting a new insert.
First step we took in the fireplace makeover was the rip the rock off. The rock got ripped off and things were looking, well, maybe somewhat better.

And things stayed like that for a long time as I contemplated what exactly to do with this wall. I wanted to wall to be pretty simple so it wouldn't compete with the reclaimed wood wall, and I wanted a mantle and floating shelves. Originally I was hoping to work around the current layout and footprint of the wall, but the more I got into designing the wall the more I realized starting from scratch was the best route to take. I even took to asking the design guru Emily Henderson for ideas on this wall. Using their Design Agony service, I submitted a picture of the fireplace wall and they came back with two design boards that they thought would work:


While there were aspects of both Option #1 and #2 that I liked, I was more drawn to Option #1 as it would brighten up the room the most with the white shiplap. And the floating wood mantel was just what I wanted to incorporate into the makeover.
Next step I started to mock things up in Photoshop to gain perspective on what things worked/didn't work.


The top option was to shiplap the whole wall, add some sconces, and a wood mantel and call it a day. Second option just replaced the shiplap with a large scale tile. And the third option would have been the most cost effective option, just putting up shiplap where the stone used to be. In the end I liked the top option the best but still wanted to tweak it. The plan I had was to:
- floating wood mantle running the whole length of the wall
- built-in shelving on top of the mantel with floating wood shelves, stained to match mantel
- modern fireplace insert
- concrete fireplace surround and hearth
- replace 9 small drawers underneath hearth with 3 large drawers
- sconce above each built-in
- shiplap on the whole wall

The above mock-up ended up being pretty darn close to what we ended up doing with the wall. The only thing the mock-up doesn't show is we ended up going with a smaller fireplace insert since code for the fireplace dictated at least 11 inches above and 6 inches on the sides of non-flammable material- which FYI shiplap is not non-flammable material. For the surround I chose to have a concrete surround custom made to butt up to the fireplace. I also went with replacing the stone hearth with a concrete hearth. Ok- are we ready to see the finished product??? I'm sure you are so let's get to it! *
*all photos below courtesy of Kelli Kroneberger**


Such a change- right?! I am more than happy with how the fireplace wall turned out. All the months of really thinking about how I wanted the wall to look, what materials would achieve that look, and what functions I needed in the wall were worth it. The concrete surround and hearth were a happy addition to the wall. For all the Colorado locals reading this, I wanted to give a shout out to Concrete Visions who I partnered with for my fireplace. They were a great company to work with! They came out and templated the area around the fireplace and the hearth and then made concrete pieces to fit in their shop. I was even able to get samples of the concrete ahead of time so that I could customize the color, matching it up to the color the shiplap would be painted. And when it was time to install the concrete pieces- everything fit absolutely perfectly! I love how the concrete provides another texture to the wall but has a modern look to compliment the wood and shiplap. I'm already thinking about other places in my home to use concrete and I think it would be the perfect surface for an outside kitchen or in my yet-to-be-built downstairs bar.
Since this project just wrapped up a few weeks ago we haven't needed to use the fireplace much yet. The cool thing about this fireplace is you can just turn the lights on for ambience without firing up the whole thing. And yes, there is a fan on this unit so I'm hoping we can warm up more than just the living room!

I don't want to go on and on about the whole process but if you have any questions please just leave them in the comments and I'll get right back to you. And let's end with a good ol' before and after so you can fully appreciate how far this wall has come! As you can see, the whole room has changed quite a bit so I owe you all an updated living room post!

**All after photos courtesy of Kelli Kroneberger**

3 Comments
[…] to Everyday Interior Design for sending along their after […]
Looks amazing! Is the shiplap MDF or siding boards?
It is MDF. Thanks!